This chapter contains the following topics:
Introduction to Billing and Payment
Entering Billings and Payments
Use this selection to enter billings, debit/credit memos, payments, and recognized profit for your jobs.
Recognized profit is used on jobs for which you are using the percentage-of-completion method of contract accounting. For the difference between the percentage-of-completion method and the completed-job method, refer to the section, How To Enter Recognized Profit Into Job Cost.
If you use both the Passport Business Solutions A/R and G/L, you will not be using this selection. In that case, enter billings, debit/credit memos, and payments through A/R, and enter recognized profit through G/L. Your jobs are automatically updated with the results of these entries when they are posted. Any attempt to use this selection will result in the error message, Billing and Payment must be entered using A/R or G/L.
This selection also prints an edit list of your entries before posting. When all billings/payments entered are verified as correct, you must post them to the permanent J/C files/tables.
|
Note |
Some of the information that J/C requests from you in this selection depends on the options chosen in Control information. Refer to the section J/C Control Information chapter for more information. |
In a sense, Billing/Payment may be thought of as the opposite of the Costing process described in the previous chapter. It is important to realize, however, that a cost is applied to a single cost item, which must therefore be specified in each case. By contrast, a payment applies to a job as a whole (or to a sub-job, if these are present and you have chosen to bill them separately). It does not apply to any of the job’s cost items individually, nor to any change orders which it may have.
Another difference is that every Billing and payment entry requires G/L distribution, which Costing requires only for direct-cost entries.
A third difference lies in the method used to import transactions from other PBS modules:
| • | Costing transactions must be explicitly imported, by you, whenever you choose to do so. You do this with Get costs. You must then post these transactions, using Costing (Post). |
| • | Imported Billing and payment transactions are automatically posted to J/C by your actions in the A/R and G/L modules. |
Select
Enter from the Billing and payment menu.
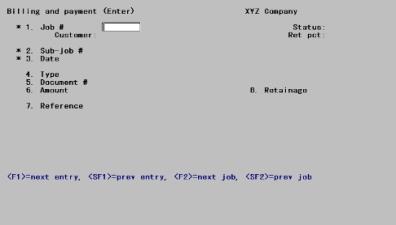
The following screen displays:
Billings/payments is shorthand for five types of entries: billings, payments, credit memos, debit memos, and recognized profit.
From this screen you can work with both new and existing entries of any type.
A billing/payment already posted cannot be changed or deleted directly. To change or delete a posted billing/payment, enter and post a correcting billing/payment to reverse the incorrect one, then (if needed) enter and post the correct billing/payment.
If a field depends on the retainage option being chosen in Control information, the paragraph will be marked (RET). This notation is for your information only and does not actually appear on the screen.
Enter the following information:
1. Job #
Options
Enter the job number for this billing/payment. The job must already be on file in the active files and its status must be active or closed. (If you receive a payment for a closed job in the inactive files/tables, you can restore the job to the active files as described in the Utility chapter.) You may also use one of the options:
|
<F1> |
For the next unposted billing/payment on file |
|
<SF1> |
For the previous billing/payment |
|
<F2> |
For the next active or closed job on file (whether or not it has any billings or payments) |
|
<SF2> |
For the previous job |
|
Format |
Up to 7 numbers |
|
Example |
Type 602 |
Upon selection of a valid job, the name and status of the job will display, also the retainage percentage if any.
2. Sub-job #
If the job does not use sub-jobs, or if it uses sub-jobs but does not bill for them, this field displays as (Not applicable) and the cursor does not move to it.
Options
Otherwise, enter the sub-job number for this billing/payment.
|
<F1> |
For the next sub-job of this job |
|
<SF1 |
For the previous sub-job |
|
Format |
999 |
|
Example |
[Skipped in this example because the job does not use sub-jobs.] |
3. Date
This date will be used to update your G/L accounts.
For a new entry, enter a date. The cursor will move to Field #4 to continue this new entry, even if there is already an entry on file for this date, job, and sub-job.
Options
To access an existing entry, use one of the options:
|
<F1> |
For the next matching entry (the next unposted billing/payment for the job entered above, regardless of the date displayed) |
|
<SF1> |
For the previous billing/payment |
|
Format |
MMDDYY The default is the date you used for the previous entry in this session (or, if this is the first entry of the session, the system date). |
|
Example |
Type 60105 |
4. Type
Options
Enter the type of the billing/payment. Enter either:
|
B |
Billing |
|
P |
Payment |
|
C |
CR memo |
|
D |
DR memo |
|
F |
Profit recognized |
The recognized profit entries, required if you use the percentage-of-completion method of contract accounting, update your G/L distributions and also appear the next time you print the Job Profitability Report. If you use the completed-job method, do not enter Type F entries even though the software will not prevent you from doing so (there is no flag in Control information [or anywhere else] to indicate which method you use).
|
Format |
One letter from the list above. The default is the same type used in your most recent entry. If this is the first entry of a session, it is B. |
|
Example |
Press <Enter> to accept the default |
5. Document #
Enter the number of the document associated with this billing/payment. For example, this could be an invoice number or a check number. This field is optional.
|
Format |
Up to 8 numbers |
|
Example |
Type 1466 |
6. Amount
Enter the full amount being billed or paid. This should include any retainage, if applicable.
Amounts are normally entered as positive, regardless of the type of entry. For instance, a credit memo would be entered as a positive amount. For a recognized profit, enter a profit as positive and a loss as negative. Otherwise, use negative amounts only if this is a correcting entry (to adjust an earlier posted transaction entered in error).
If you change the amount for an existing entry, you will have to re-enter all the distributions as described later in this chapter.
|
Format |
999,999,999.99- |
|
Example |
Type 28500 |
7. Reference
Enter any desired description of the billing/payment. This field is optional.
|
Format |
2 lines of 25 characters each |
|
Example |
Type First progress billing Press <Enter> again |
8. Retainage (RET)
If you stated (in Control information) that you do not use retainage receivable, this field does not appear on the screen.
If this entry is for recognized profit, this field displays as (Not applicable) and may not be changed.Profit is not subject to retainage.
Options
Otherwise, enter the retainage portion of the amount being billed or paid. If the amount (Field #6) is positive, this field must be positive (or zero). A negative retainage is permitted only when Field #6 is negative. In either case, the absolute amount of Field #8 cannot exceed that of Field #6.You may also use the option:
|
<F2> |
For the amount computed by multiplying the amount of Field #6 by the retainage percentage shown at the upper right of the screen (provided both are nonzero) |
|
Format |
999,999,999.99- |
|
Example |
Press <F2> |
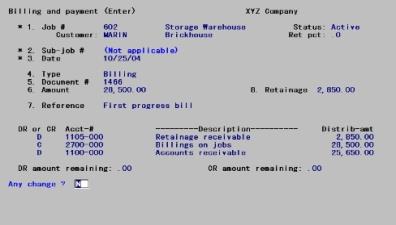
Field number to change ?
Options
Make any desired changes. If this is an existing entry, you may also use one of the options:
|
<F1> |
For the next billing/payment on file |
|
<SF1> |
For the previous billing/payment |
|
<F2> |
For the next active or closed job on file (whether or not it has any billings or payments) |
|
<SF2> |
For the previous active or closed job |
|
<F3> |
To delete this entry. |
|
<F5> |
For a correcting entry Available only if you answered Y (in G/L Control information) to the question, Allow correcting transactions ?. Good accounting practice requires that transactions submitted merely to correct earlier erroneous entries should be identified as such. This avoids artificially inflating your apparent cash flow. |
Upon pressing <Enter> from a blank Field number to change ?, you are ready to distribute the amount.
Additional fields now appear on the screen for distribution:
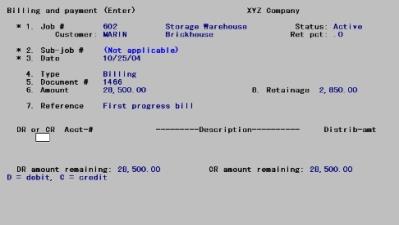
The new fields are organized as a table of several rows and columns. Each row represents a debit or credit distribution to a single account. You must distribute the full amount of the entry to G/L accounts for both the debit and the credit distributions. You can have as many as five distributions, or as few as two (one for credit and one for debit).
You always work in the first row, and as each new distribution is entered, it is scrolled downward. There is room only for the two most recently entered distributions plus the one currently being worked on.
The debit and credit amounts remaining to be distributed are shown continuously at the bottom of the screen. Each is originally equal to the full amount of the entry.
For a new entry
After you enter each distribution, you are asked Any change ?. If you respond Y, you are allowed to change the amount (but nothing else).
For an existing entry
If you have changed the amount (Field #6) and/or the retainage amount (Field #8) before entering the distribution process, the former distributions are ignored and you must re-enter them in full, exactly as though this were a new entry. You are warned that you must do so and are not given the option of viewing the existing distributions.
If you have not changed the amount, the distributions currently on file can be retained or changed, at your option.
| • | You can retain the existing distributions by pressing <Esc>. |
| • | You can enter one or more new distributions, just as though this is a new entry. Choosing to enter distributions this way does not mean that the existing distributions are superseded; any new distributions you add are in addition to the ones already on file. |
If the account number you enter already exists, the distribution amount already on file for that account will appear and you will be asked Any change ?.
If not, you will be asked Distribution not on file. Do you wish to add it ?. Answer Y to add the new distribution or N to correct the account number.
| • | You can view each existing distribution entry by pressing <F1>. As long as another distribution entry exists it will be displayed and you will be asked Any change ?; otherwise, you will be informed that there are no more distributions on file for this entry. |
If you discover that a distribution is wrong after you have moved on to another one, simply enter the same account number as though it were a new distribution.You can then change the amount.
| • | In doing this you do not create two distributions with the same account number (even though the two entries may appear on the screen simultaneously). The later entry simply replaces the earlier. |
| • | You can do this even if you have already entered five distributions. A sixth entry is accepted for correction purposes only. |
| • | You can do this for both new and existing entries. |
To delete a distribution, set the amount to zero. This is the only case in which a zero amount is accepted. You are informed that the distribution has been deleted. You might use this feature if you had mistakenly split an amount between two different accounts when it should have gone entirely to one of the two.
You cannot change the account number of a distribution, but you can accomplish the same thing by deleting an existing distribution then entering a new one for the same amount but for a different account number.
After entering all the distributions, you are positioned to enter the next (even if five distributions have already been entered). Press <Esc> at this point to exit from distributions and proceed to the next entry.
| • | If you do this at a point where the amounts remaining are zero (both debit and credit), the entry is completed and you may proceed to the next. |
| • | If not, you will be asked, Are you sure you wish to cancel the entire entry ?. |
Answer N to go back to entering distributions.
If you answer Y and this is a new entry, the entire entry is canceled and you must begin again.
If you answer Y and this is an existing entry, the entire entry is restored to what it had been before. Note that this means not only the distributions, but the numbered fields as well (even if the amount has not changed).
| • | Reducing both debit and credit amounts to zero does not automatically exit the distribution process, even if the maximum number of five entries has been reached. You must still press <Esc>. |
DR or CR
For each distribution, enter the following information:
Enter D for debit or C for credit for the distribution.
Options
You may also use one of the options:
|
<Esc> |
To exit from distributions |
|
<F1> |
For the next distribution (if this is an existing entry whose price has not changed) |
|
<SF1> |
For the previous distribution |
These options are explained in greater detail in the introduction to this section.
|
Format |
One letter, either D or C |
Acct-#
Options
Enter an account number, or use one of the following options:
|
<F1> |
For the next account from Valid G/L Accounts |
|
<SF1> |
For the previous account from Valid G/L Accounts |
|
<F2> |
For the default account, if there is one. The defaults are explained in the table below. |
If you have set up your G/L accounts and defaults properly, then when you use the <F2> option you will automatically get the proper account for each distribution:
|
Type |
Which time? |
Default account |
|
|
Debit |
Credit |
||
|
Billing |
1st |
A/R account from Control information |
Billing account for the job (or sub-job, or change order) from Job descriptions |
|
2nd |
Retainage receivable account from Control information |
[no default] |
|
|
Payment |
1st |
Cash account from Control information |
A/R account from Control information |
|
2nd |
[no default] |
Retainage receivable account from Control information |
|
|
Credit memo |
1st |
Billing account from Job descriptions |
A/R account from Control information |
|
2nd |
[no default] |
Retainage receivable account from Control information |
|
|
Debit memo |
1st |
A/R account from Control information |
Billing account from Job descriptions |
|
2nd |
Retainage receivable account from Control information |
[no default] |
|
|
Profit recognized |
[no default] |
||
|
Format |
Your standard account number format, as specified in Company information |
|
Example |
Press <F2> |
Distrib-amt
This is the amount of the debit or credit distribution. The following rules apply to the amount:
| • | It cannot be negative. |
| • | It cannot exceed the amount remaining to distribute. |
| • | It can be zero only if you are correcting an existing distribution and wish to delete it. |
Options
Enter an amount, or use the option:
|
<F2> |
For the full debit or credit amount remaining, as displayed on the screen. Exception: If retainage is present and you press <F2> at either the first debit distribution or the first credit distribution, you will get the full amount less the retainage. |
|
Format |
999,999,999.99 |
|
Example |
Press <F2> |
Any change ?
Answer N to accept this distribution. This distribution, and any others you have already entered, will scroll down one line, and the cursor will be positioned at the beginning of the same line to enter the next distribution.
Answer Y to change the distribution. You can change only the amount. To change the account number, refer to the introduction to this section.
|
Example |
Enter distributions as follows: |
|
DR/CR |
Acct-# |
Description |
Distrib -Amt |
|
C |
2700-00 |
Billings on jobs |
28,500.00 |
|
D |
1100-000 |
Accounts receivable |
25,650.00 |
|
D |
1105-000 |
Retainage receivable |
2,850.00 |
Only the C and the two D’s need to be typed. The account number and amounts are obtained by pressing <F2> .
At this point the screen displays as follows:
Press <Esc> to terminate the entry.
Before posting your entries to the permanent Job Cost files/tables, print an edit list and review it for completeness and correctness.
You may view a Billing and Payment Edit List example in the Sample Reports appendix.
Select
Edit list from the Billing and payment menu, or select Billing and payment edit list from the Reports menu.
The following screen displays:
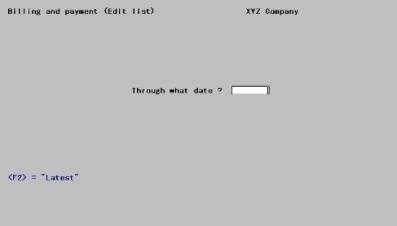
Enter the following information:
Through what date ?
Enter the latest (cut-off) date of entries you want to show on the edit list. This should match the date through which you intend to post these entries, such as the last day of your current accounting period.
Options
You can use the option to show all the billing and payment entries you have entered:
|
<F2> |
To set this date to Latest |
|
Format |
MMDDYY |
|
Example |
Press <F2> |
Any change ?
Respond Y to re-enter the screen, or N to print the report.
When you are sure that all billing and payment entries have been entered correctly, you can post them to the permanent Job Cost files/tables.
You may view a Billing and Payment Register example in the Sample Reports appendix.
Select
Post from the Billing and payment menu.
The following screen displays:
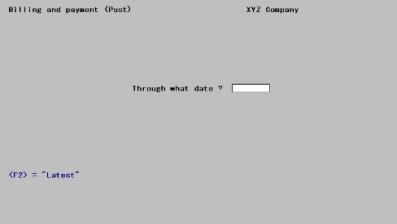
Enter the following information:
Through what date ?
You will be asked to enter the date through which you want to post. This allows you to post some, but not all, of the entries on file.
Options
Enter the latest date of the entries you wish to post, or use the option:
|
<F2> |
To set this date to Latest |
|
Format |
MMDDYY |
|
Example |
Press <F2> |
|
Note |
If you intend to post all of the entries on file, press <F2> for Latest instead of entering the date of the latest billings/payments on file. The posting process takes less time if you use <F2> |
Any change ?
Respond Y to reenter the screen, or N to continue.
If you answer N, the Billing and Payment Register then prints and shows all billings/payments being posted. As this is an Audit Trail report, you cannot direct it to the screen.
A running display of the cost item currently being processed will appear:
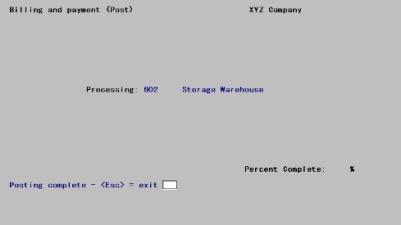
When complete, press <Esc> to return to the menu. Processing may continue for a brief period even after printing has terminated.